Oh Happy Day!!

Sorry, no Mingle Monday today.

Not only is it Memorial Day, but today is also my 7th wedding anniversary....

so.... I'm taking the day off!!

Enjoy your day off too, and have some delicious BBQ food for me! :)

Photobucket

Nesting Series: Zippered Throw Pillow Cover

Anyone who has had a baby knows that while there are so many joys with a newborn, there are also a lot of messes!! I won't go in to detail on what those are {yes, you can thank me for that} but we all know what they are!!

I wanted to add a cute pillow to my recovered {almost done even} glider chair, but I also wanted the pillow to be washable! So, I decided to create a zippered pillow cover. While I'm filing it under my "Nesting Series" you can absolutely use this tutorial for any pillow cover that you want to make! No matter what size your pillow is!!!

Here's how mine turned out:


I actually used flannel left over from a receiving blanket I had made. I wanted something soft, washable, and somewhat durable.

Remember my tutorial here where I showed you how to create your own throw pillows from an old standard pillow??!?


I actually recycled one of those pillows to create my little throw pillow for my glider chair! 

Here's how I made my zippered pillow cover.

What you need:
Throw pillow {either store bought or upcycled}
Fabric scraps
zipper
sewing machine, thread, iron, etc.....

Step 1:
Be sure to wash your fabric first!!!! 

Then cut out your front and back pieces. 


I did this very precisely - NOT!! I just folded my fabric in half, laid my pillow on top, and cut around my pillow leaving about an extra inch all the way around. 

If you want to get technical you could always get out your measuring tape and use your rotary cutter and ruler... but I find that where I can speed up my sewing process and not have to be exact, I do! 

Step 2:
Add your zipper. 

This may seem tricky -- but don't stop reading just because you have never worked with a zipper before. I promise... you can do this! 

The size of your pillow will determine the length of your zipper {unless you are me, and just use whatever zipper you have on hand because you don't want to make one more trip out of the house!} For example, a 16" throw pillow should have a 16" zipper. It just works out easier that way! BUT, is you don't happen to have the exact sized zipper you need, you can sew it in the way I did. 

The one thing you HAVE TO HAVE is a zipper foot for your sewing machine. It looks something like this. 


It makes it so that your needle can sew right up next to that zipper. Most new sewing machines will come with one, but if yours didn't I absolutely recommend that you get one. You can go to any sewing machine store or your local craft store that sells sewing machines and they'll be able to help you find the right one. 


The hardest part about putting in a zipper is figuring out which side of the zipper and fabric to pin together. I'm going to try my hardest to explain it, but sometimes trial and error are your best friend. 


Since my zipper was shorter than my fabric, I chose to place mine in the center of one of the longer sides of my pillow.  Turn your fabric right side up and your zipper upside down. pin the top side of your zipper to the top side of your fabric -- as shown in the picture above. This way when you are done sewing, you can flip your fabric over and it will be on the right side of the zipper. 

Using your zipper foot, sew your zipper and fabric together. I used a 2.0 cm stitch so that it will really be held on strong! Start sewing at the end of your actual zipper and end at the end of the actual zipper -- not the zipper fabric part. Be sure to back stitch at the beginning and end of your zipper. 


You will want to sew close to the zipper -- in the middle -- but don't sew on the zipper. The closer you sew to the middle of your zipper the less zipper you will see on your finished product. 

Once you have sewn down your zipper, turn your fabric over and it should look something like this -- slightly different depending on how close you were able to sew to the zipper. 


I then like to top stitch my fabric to the zipper. It gives it a much cleaner look and helps to keep the fabric in place. 

As you sew you may need to raise your presser foot and zip or unzip your zipper to be able to sew around it. 


Repeat those steps on the other side of your zipper. Your second piece of fabric should lay on the first when it is pinned to the zipper. If you are unsure if you have it right, pin your fabric in place, then gently turn your fabric over and make sure that it will end up on the right side of your zipper {sorry, forgot a picture of this step... darn pregnant brain!!}

Once you are done with both sides it should look like this:


Step 3:
Pin your pillow cover together and sew. 

Fold your pillow cover so that the right sides of your fabric are touching. Then reach in and unzip the zipper about half way. If you don't you will not be able to turn your cover right side out once it's sewn! 


Once your pillow is pinned sew all the way around -- excluding your zipper of course since you already sewed that in. 

As you sew, you will want to pull the fabric ends of your zipper through so that they stick out as you sew. {Here's my terrible picture to help explain what I mean.}

By pulling the tails through the top -- or the inside of your pillow cover -- it will help your finished zipper to look much neater on the outside. 


Step 4:
Turn pillow cover right side out and stuff your pillow in. 

Be sure to iron all of your stitching to set it. Then clip your corners and turn your pillow cover right side out. Easy peasy lemon squeesy since you left your zipper half way open!! 

Then stuff your pillow inside. 


Zip it up, and you're done! 

The hardest part is putting the zipper in, but once you have that step done it's smooth sailing!! 

**If you are lucky enough to have a zipper that is the length of your pillow side, when you pin your two pieces of fabric together at the end, just be sure to sew your sides so that the fabric ends {tails} of your zipper end up on the outside edge of your seam. 

Now go make a few more!! Personalize a pillow and give one as a wedding or house warming gift! Make a couple for your couch or window seat. Add some throw pillows to your bed! {Something I plan on doing for sure!!}


Don't mind my partially finished glider chair... still need to finish the arm rests on it! But at least it has a cute pillow now!! ♥


Where do you need to add a throw pillow .. or two!?!? 


Photobucket

Mingle Monday - 5.21.2012

Welcome to another fun week!

FYI, my etsy shop is going on maternity leave starting 5/21. I will still be making custom headbands and flower clips if anyone is interested, but only by request. Otherwise, be sure to get your order in before my shop closes tomorrow.

You can use coupon code MOMMY2012 for 10% off your entire order, or FREESHIP2012 for free domestic shipping.

Although my shop will be on maternity leave, my blog won't be. So make sure to check back often. With my shop being closed I'm hoping to get some good Nesting Series tutorials posted, along with some that I can set to post while I am recovering. I don't know about you, but I don't just bounce back when I have a baby. It takes me a week or two to feel human again! ♥

- - - - - - - - - - -


Visit as many blogs on the link list as you would like. Make sure you leave a comment and tell them you are stopping by from Mingle Monday!

Please link family friendly blogs ONLY!! I would hate to have to delete anyone from the blog hop. 

Become a follower here on my blog so that you can take advantage of any and all freebies that I offer {usually once a week}.


Photobucket


Just a glimpse...

Here's what I was working on yesterday!


A new pad and zippered slip cover for my nasty well-loved glider chair. It's been on my to do list for a while and the fabric has been taunting me from it's box. Yesterday, I started the makeover. In one afternoon I got this done. 

The pad is 4" thick foam... I'm planning to be nice and comfy since I will be spending so much time in the chair! 

Anyone interested in the tutorial on how to recover a chair like this!?!? I took pics, but I'm curious to see who's interested... it may have to be a multiple post kind of tutorial... 

Photobucket

Nesting Series: Antique-Style Baby Quilt

If you are like me, you LOVE to window shop at Pottery Barn Kids. I say window shop, because I know I could never afford to get all the super cute things they have. BUT, I am working on recreating some of what they have. 

Today, as part of my Nesting Series, I have put together a simple tutorial on how to create an antique-looking baby quilt {inspired by the stylish and fun ones I've seen on Pottery Barn Kids}. 

What makes it look antique!? It's the little wrinkles and creases in the fabric. It gives it a worn look ... like it's been around for-ev-er! 


Since this is my first attempt at a quilt like this, I will show you how I did it, and the improvements I will make the next time around.

But, for a first attempt, this one turned out pretty good I think! 

Want to make your own?? Here's how I did it. 


Supplies:
1 yd of each of 3 coordinating fabrics
safety pins
cotton batting
binding strips
disappearing ink fabric marker
the usual: iron, scissors, sewing machine, rotary cutter, ruler, and mat

The nice thing is, that to make it look antique is just a simple technique. You can choose whatever fabric pattern you would like to create. You can also choose to do simply one piece of fabric on the front and one on the back. The possibilities are endless and you can make it as simply or intricate as you like. 

Step 1:
DO NOT WASH YOUR FABRIC!!!!!! This is super important. If you wash your fabric, it will not wrinkly up and give you the antique look. 

Go ahead and iron all of the creases out of your fabrics. 
Then, if you haven't already, put together your pattern plan! 

This was mine:


Step 2: 
Cut out all of your pieces. 

I ended up with a large rectangle of the rose striped fabric for the center of my quilt...


... and 4 long skinny rectangles for my sides. {2 of the teal size and 2 of the pink size -- from my plan above}


Step 3:
Sew your pieces together. I chose to leave my corners square {vs. mitered} so I started with my smaller rectangles and pinned and sewed those on. Pin right sides together and leave 1/4" seam allowance. 


Once the sides are sewn, you need to iron them in place. Open your fabric and iron it flat. Make sure you iron your seam on the wrong side facing towards the center of your quilt. 


Step 4:
Repeat for the longer sides of your blanket. Then top stitch along the middle section of the quilt to hold the seams in place all the way around. This will help when it comes to the next step... a lot!! 


Step 5:
This is where having a nice long ruler and the disappearing ink fabric marker come in handy! 

You need to create your stitching pattern for the top of your quilt. The closer together the lines in your design, the more wrinkly your quilt will be. 

I created a diamond pattern on the middle section of my quilt by drawing diagonal rows that were 2" apart. 


I used my cutting mat to find a 45º angle to start my first row. 

On the pink strips, I chose to keep it simple and do straight lines. I started by drawing a line from the corner of my center rectangle to the outside corner edge of my pink strip to create an angle for my corner stitching. Then measured 1" from my center rectangle and drew a line all the way around the pink section. 

Then measure an inch from that line and drew another, and so on so that my finished drawn pattern looked something like this:
{though it was a lot more precise on my quilt -- the disappearing ink didn't photograph very well so I don't have a really good picture of my finished design drawn on :'( .So you'll just have to imagine it. }

Step 6:
Time to layer your blanket together. Start by placing your backing fabric -- the green floral print in my case -- right side DOWN. Then place your cotton batting on top of that, and your quilt top on the batting -- right side up. You are creating a sandwich for your batting. 
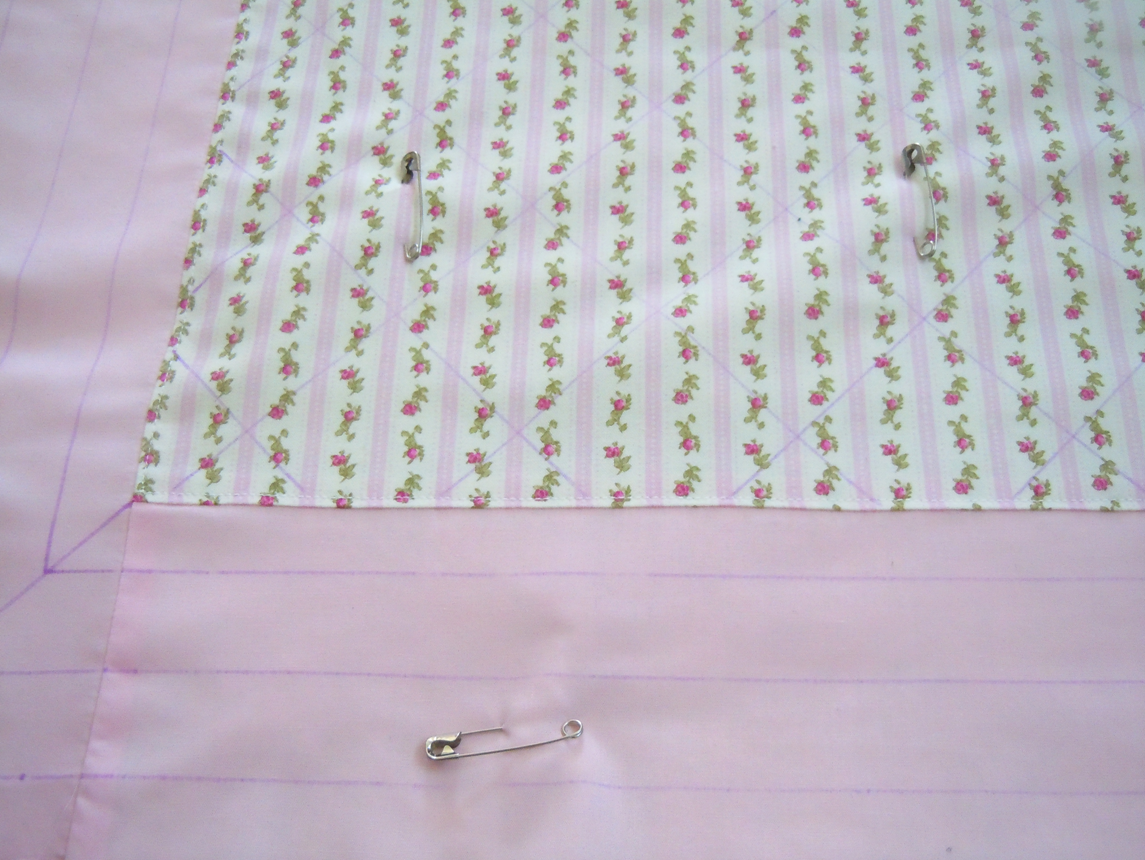

Step 7:
Safety pin all three layers together.
Now, I thought ahead in making this blanket -- I know... at least my pregrant brain was working a little -- and drew all of my lines before placing my layers together. Why is it such a good idea to work in this order!?! Well... if you try and pin, THEN draw your lines it's a little tougher to draw them. PLUS, this way I already know where I will be sewing and I can place my pins between the lines so that I don't have to remove them to sew. Smart huh!?!? 

In the quilting section of your local fabric store they will carry "basting pins". They are essentially safety pins. So, if you have a bunch of safety pins laying around... just use those. 

You'll want to place your pins 3-5 inches apart so that it holds all 3 layers of your blanket together nicely. 

{here you can see the lines for my pink sections}


Step 8:
Trim the excess batting so that you don't have quite so much to work with. 

Then carefully take your blanket to your sewing machine. You are going to sew along the design lines you created. When you start and stop your diagonal stitches you will want to be sure to start and stop along that top stitched line you sewed way back in the beginning to hold your seam flat. 

It takes some time, but try and be precise. Luckily, if you have a couple goofs it's not a big deal... it adds to the antique looking nature of the blanket. 

When you are done sewing, the back of your quilt will look something like this: 


The ends of your diamond lines are unfinished. In order to fix it on the back so that your quilt has a sewn pattern on the back as well as the front, restitch across the edge stitching you did in the beginning to hold the seams in place on your side pieces. 


This creates a border around your diamond pattern on the back as well as the front. Just follow the same stitching line you originally did. 

Step 9:
Sew around the straight lines you drew on the outside border of your quilt. When you reach the corner, ignore your diagonal line {it was just for reference} and sew a nice crisp square corner. 


Step 10:
Trim your fabric all the way around so that your sides are nice and straight and your corners are crisp. Then add your binding. There are about a billion different tutorials out there for adding binding. I didn't add this step to my tutorial ... I'm saving it for another day .. but here is a link to my favorite tutorial on how to create your own binding strips and sew them on. I use this method all the time! 

Once your binding is on, trim all your thread ends -- front and back of your blanket -- and wash and dry it. 

Once it comes out of the dryer it will be wrinkly and have that old feel to it! 


Now that you know how to get the effect, you can try all different patterns of top stitching. I kept mine simple -- going with straight lines -- but you could draw butterflies, swirls, hearts, or any other shape. If you want your stitches to be hidden, make sure you use colored thread to match your fabric. I am a white thread kind of gal... and use it on EVERYTHING! 

As I said earlier, you can make it even more simple by only using 1 fabric for the top and 1 for the bottom -- so you don't have to piece any fabric together. AND you can use store bought binding which makes it even easier!!

Photobucket

Mingle Monday - 5.14.2012

I hope everyone had a great weekend and a FANTASTIC Mother's Day!!

I didn't have to make dinner last night, AND my kids cleaned up their bedrooms. That was enough of a gift for me! I got to take a nap and sit and put my feet up for a while!

If you haven't had a chance to check out some of the changed around here, be sure to take a look around!
I added a drop down menu bar to make finding what you are looking for MUCH EASIER. I included an entire tab dedicated to my Nesting Series. Each new post will be added to the drop down list.

Now, let's mingle!!


Visit as many blogs on the link list as you would like. Make sure you leave a comment and tell them you are stopping by from Mingle Monday!

Please link family friendly blogs ONLY!! I would hate to have to delete anyone from the blog hop. 

Become a follower here on my blog so that you can take advantage of any and all freebies that I offer {usually once a week}.


Photobucket


Nesting Series: Crib Sheet Tutorial #2

If you have been a reader for a while, you may remember the tutorial I wrote a while back on how to make a crib sheet {also works for a toddler sheet}.

Today I am showing you a second version. This time using my serger -- for anyone who owns a serger and wants to know how to do it. {If you don't own a serger, feel free to refer to my first tutorial for instructions -- OR -- beg and plead for one for Mother's Day!!!}


This time I also chose to make my fitted crib sheet out of flannel -- not cotton!


Want to make your own!?!

Here's what you need:
♥ 2 yds of flannel {or cotton}
♥ 2 yds of 3/4" knit elastic {I like knit because I find it stretches the best!}
♥ the usual stuff - {serger, sewing machine, iron, thread, scissors, rotary cutter, mat and ruler}

Here's how:
Be sure to wash and iron your fabric before beginning!

Now it's time to cut. If you have a standard sized crib mattress you can follow these instructions -- if yours is a different size, be sure to measure your mattress before beginning! 

My finished rectangle dimensions were 43" x 66". 


To cut, I folded my fabric width in half {like it is wound on the bolt at the store}. Then with my rotary cutter, ruler and mat, I make sure the starting edge is straight. Then measure out my 64" and cut there. 


Next I took a simple sheet of scratch paper and created a pattern for my corners by making an 8" square. 


Then using my disappearing ink marking pen I traced around the square in each of the 4 corners of my rectangle. Then using my fabric scissors simply cut the squares out. 


Take one of the corners and fold the cut edges so that they meet each other - wrong side of the fabric on the top -- so that you sandwich the right side of the fabric in the middle. 


Then using your serger, simply serge down the edge to create the pocket for your mattress. 


Repeat with the remaining 3 corners. Then use serge around the entire bottom part of your sheet. 


I forgot to take photos of this next step, but it's a fairly simply one... and if you would like to refer to my previous post for pictures, feel free! 

Take your sheet to your ironing board and steam iron the serged sides and edges that you have finished. This helps to set the stitching! Next you are going to create the pocket for your elastic. 


You can do this in one of two ways! I like to use a ruler to make sure that my pocket is the same size all the way around. If you choose this method, set your ruler to the 1" marking and iron a 1" fold all the way around the bottom of your sheet. 

OR

Open your elastic and  use it to measure the width of your fold. You'll want to add about 1/4" extra to the width of your elastic so that you have room to stitch your pocket closed and a little bit of wiggle room to feed your elastic through. 

Now, take your sheet to your regular sewing machine and straight stitch about 1/8" from the serged edge of the folded pocket so that your opening will be 3/4" {the width of your elastic} + 1/8" wiggle room.

Be sure as you sew to leave a 1-2" opening so you can feed your elastic through. 

Use a safety pin attached to one end of your elastic to feed it through the pocket all the way around your sheet. Don't let the other end get "sucked" into the pocket -- you'll have to either go fishing for it, or start all over! It takes some time to get the elastic all the way through, so sit back, put your feet up, and get comfy!

Once your elastic has made it's round trip journey ☺ sew the ends of the elastic together and feed the left over back into your pocket. You may need to re-distribute the elastic in your pocket to get it all to look nice. 

Then straight stitch your pocket opening closed and you are all done! Time to try it out on your mattress!!


It's super simple to do and only took me about an hour -- including all the ironing time and trying to get up off the floor from cutting my fabric. 


 Make a couple for yourself -- we all know babies make nigh time messes! Or, impress your friends and give a couple as a baby shower gift!

The best part is, if you want a custom look for your nursery, you can totally use whatever fabric you want! You aren't limited to what you can find at Target or Babies R Us.

PLUS... this whole sheet cost me a total of about $7 -- since the flannel was on sale. But the possibilities are endless!


Only 10 weeks to go and still so much to do:
crib sheet
curtains
• recover glider chair
• boppy pillow slipcovers
• changing pad covers
• wash baby clothes
• baby quilt
• baby playmat
• nursing cover-up
• carseat canopy
• pack 'n play changing pad cover
• diapers and wipes pouch

-  -  -  -  -  -  -  -  -  -  -

Updated 2/25/14

I am working on a nursery/toddler room for my boys. I used this tutorial again to make this cute crib sheet for the new crib! I can't wait until baby comes {in about 10 weeks} for him to use it! 


- - - - - - - - -

Want to learn how to make your own muslin crib sheets like Aden and Anais for a lot less money!? Check out my post on where to buy your fabric and how to work with it to make your own crib or toddler bed sheets.