Bake Sweets Giveaway

*Giveaway is now closed!*

It's about time for another giveaway! Alexandra from Bake Sweets contacted me and has put together a fantastic little giveaway for all of you!


Bake Sweets is a great new shop on Etsy where you can find all the fun things to make the perfect party!

Check out these bright fun cupcake liners! The best part is that you can use them for cupcakes {of course} or use them as colorful cups for bite sized finger foods or cookies.


How about a cute crown shaped cookie cutter for your next royal party! Wouldn't these make the cutest cookies!?


How about these wonderful cupcake liners for your Thanksgiving Dinner this year? Fill them up with yummy desserts. Make individual pumpkin cheesecakes. Yum!


How about some biodegradable paper straws? Perfect for an outdoor party {just in case the neighbor's little monster boy decides to hide one or two in your yard}. Or use them as part of your table decorations. The stripes are just too cute for words!!


Take a look at the rest of the fantastic party and baking supplies that Bake Sweets has to offer.

•   •   •   •   •

Now, for the super great part! Bake Sweets if offering an entire "Everything You Need Cupcake Pack" plus a gel food coloring bottle of your choice to one lucky winner!


This wonderful cupcake pack includes the following:
3 Extra large pastry tubes:
round tip, french tip, open/closed starter tip

3 Packets of sprinkles 2 oz each:
blue sanding sugar, chocolate Jimmies, confetti sprinkles

100 Cupcake Liners:
25 each of Polka dot, Teal, Magenta, Yellow

Decorative Container to be reused

• 8 Disposable Frosting Bags

Plus, choose any ONE of the gel food coloring bottles that are in her shop.

That's a $22 value and you will have everything you need to create the perfect cupcakes for your next party!


Here's how to enter:

Mandatory Entry: Visit Bake Sweets Etsy shop and look around. Come back and leave a comment on this post with an item that you would love to have!

1 Additional Entry: Become a follower of this blog and leave a comment that you are.

3 Additional Entries: Blog about this giveaway. You must leave the link to your post {on a public blog} in your comments. Please leave one comment for each entry.

2 Additional Entries: Share this giveaway on Facebook. You must leave a link to your wall so I can check it. Please leave one comment for each entry.

All entries must be received by Saturday November 5, 2011. Winner will be announced on Monday, November 7, 2011.

Good luck!

Mingle Monday 10.31.2011 - HAPPY HALLOWEEN!!!

{For some weird reason I am having trouble getting my html code box up and running for you to grab my Mingle Monday button. I am working to figure it out and if I can get it working I will add it on here.}

Here is a taste of what Halloween has in store for my kiddos tomorrow!

Here's my little Rapunzel twirling around! I love how her hair flies out when she twirls!


A true pirate can make do with anything when he can't find his sword!


I hope you all have a safe and happy Halloween!!!!

Photobucket


 Make sure you are a GFC follower {on the right sidebar}.
Add your blog to the linky list.
Visit whomever you want making sure you tell them you are visiting from Mingle Monday!
Be nice, and have fun.

*Open to family friendly blogs only, PLEASE

Come back Monday for a giveaway that you totally won't want to miss!!


Tutorial: Installing Eyelets on Fabric

My little guy is going to be a pirate for Halloween this year. I wanted to create a real pirate-looking shirt for him. While wandering through JoAnn's looking or inspiration and ideas on what to do, I found these eyelets.. and figured I would learn how to do it and share with all of you!


You can use eyelets in projects as purely decorative {like they do on jeans where the seams come together} or for function, like on a corset.

Eyelets are sold in the "notions" section of the craft store with all of the Velcro, elastic, and pins. While you are there pick up a disappearing ink fabric marker - usually in the quilting supplies section. You will also need a small hammer and small, sharp scissors.


Eyelets come in several different sizes, so find the one that fits your project and make sure you buy the eyelet kit because it will come with the anvil.


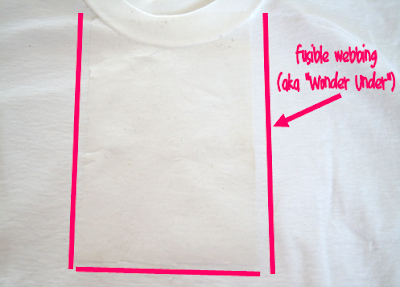
I put my eyelets on a white t-shirt that I already had but since the knit fabric of the t-shirt is thin, it needed some reinforcing. I used Wonder Under (a fusible fabric interfacing) to give it some strength. Just follow the directions on the package and be sure to completely cover the area where you will be placing the eyelets. Be sure to iron it onto the WRONG SIDE of the fabric.


If you are making a pirate shirt like I am, cut the collar off the shirt.


Use a measuring tape or a ruler to mark how far down you want to your eyelets to extend. I placed  dot at the top and one at the bottom. Since you are using disappearing ink it doesn't matter that you have these dots.


Now it's time to figure out where your eyelets will go. I equally spaced mine going vertical from my top dot to my bottom dot. Then gradually made them closer together horizontally so that it created a slight "V".


Grab your scissors. Fold the fabric around the first dot so that it is on the crease of your fold. With your scissors make a small snip on that dot. Your snip will look like a "V". Then cut the flap of your "V" off so that you end up with a very small triangle shaped hole.
{Be sure to practice on a scrap piece of fabric first. If your hole is too big your eyelet won't stay in place.}


Take your eyelet and push it through your triangle hole from front to back so that the flat part is on the front of your fabric. You want the fabric to be snug around the base of the eyelet.


Your kit comes with all of the eyelets, plus 2 pieces to the anvil. The smaller piece is the base. It has a raised bubble for you to place the hole of the eyelet on top of. This keeps your hole round as you hammer. The longer piece you place on top of the eyelet - like a sandwich with your fabric and eyelet in the middle. Then with your hammer you gently tap the top so that it bends the back of the eyelet down around your fabric.


Make sure that your eyelet backing bends all the way down. You don't want any sharp edges, especially if it is going to be touching skin like mine will be.


Repeat for the entire side.


Then do the other side. I had to adjust the placement of my bottom 2 eyelets to allow for a tiny space between them. Again, with the disappearing ink marker you don't have to worry about those purple dots. They will disappear.


Then I took my scissors and cut a straight line right down the center of my "V". The interfacing helps the fabric to keep it's shape so it doesn't just flop around because of the weight of the eyelets.


Then I threaded my cording through like a shoelace, tied a knot in both ends so that it doesn't come out, and singed the open edges with a lighter to keep them from fraying.


And there have it! An easy pirate shirt.


What do you want to put eyelets on?!
Photobucket

5 Playroom Must Haves!!


{source}

Thinking of redoing your playroom? Here is a list of my 5 "must haves" in a perfect playroom. 

1. storage
2. workspace/playspace
3. comfortable seating
4. library
4. artwork display
• • • • • 

1. Storage. And this room has a ton of it. You must have a place to store all those toys and supplies or they spill over into all the other rooms of the house.


2. Workspace/Playspace. Not only does this room have the table and chairs, but the storage cabinets are lower so they can function as play space as well. 


3. Comfortable Seating.  A must have for young and older kids. The perfect place for watching and movie, reading a book, or chatting with friends.


4. Library. Whether big or small, every child needs a place to store their books. Choose a bookshelf, or create a vertical storage system. Either way, it's a must!


5. Artwork Display. Use frames and shelving to display artwork by your children. Display it in a prominant place for all to see and admire.


Or use wire curtain mounts to create a custom artwork display.


What is on your MUST HAVE list for your ideal playroom!?
Photobucket

Infant Portraits

I know there are a lot of photographers out there... some of which may actually read this blog! I wanted to let you in on a little known secret...

The chenille blankets that are sold in my Etsy shop {which is actually on vacation for another 2 weeks or so as I gear up for a craft show} make fantastic photo props. Don't believe me... take a look for yourself!


And for those of you who aren't photographers and are looking for a great all-purpose blanket... here's proof it works well for that too!

{photos courtesy of Shillawna Ruffner Photography}

As always, a BIG thanks to my super talented cousin-in-law Shillawna for taking such wonderful photos using my blankets! If you are located in the So Cal area and are looking for a great photographer for family portraits, infant portraits, or just because photos you should totally check out her work.

P.S. If you have a picture of one of my products {burp cloths, blankets, onsies, or digital designs} I would love to share it! It may even make it on an Etsy listing... email them to me at kdbuggieboutique[at!]yahoo.com.
Photobucket

Mingle Monday - 10.24.2011

Halloween costume crunch week is here! If you are like me you have procrastinated saved some costume details 'til now. This week I am making a pirate costume for my little scallywag! I am hoping to get the tutorial up by Wednesday... just in case anyone else is making a pirate costume this year.

We have spent this weekend doing some home renovations... trying to get all of our baseboards done before our 1 year mark in our new home. I would love to get our kitchen and bathroom painted as well, but we are pressed for time with my upcoming craft fair. So, if we can finish baseboards I will consider it a BIG accomplishment!

P.S. If you are looking for the Thanksgiving photo card designs you can find them here.

Photobucket


 Make sure you are a GFC follower {on the right sidebar}.
Add your blog to the linky list.
Visit whomever you want making sure you tell them you are visiting from Mingle Monday!
Be nice, and have fun.

*Open to family friendly blogs only, PLEASE

Tutorial: Trick or Treat Bags

Do you remember as a kid going trick or treating with a clean pillow case? We never had the cute trick or treat "bags" that you can find now. For example:


{from Target.com}

Well... I decided that since our pumpkin buckets from last year weren't big enough for all the candy that my kids got, that I would make them some larger trick or treats bags to take this year.

{p.s. this is also a great pattern for making a handy tote bag or reusable grocery bag!}


They are not as cute as the ones above... but they work for any costume choice, are a timeless design, and we plan on saving them for years!

Want to make your own pillow case trick or treat bag{s}? Here's how.

Supplies:
3/4 yd print for outside of bag
3/4 yd solid for inside of bag
thread
sewing machine
scissors
iron and ironing board
{and about 1 hour to do it all}


My kids each chose the fabric for their bags. My daughter - pink of course! My son  bugs!!!

*Make sure you prewash/preshrink and iron your fabrics before starting!!!

Fold your fabric in half so that you end up with a 3/4yd x 22" piece {just like how it would look wrapped around the bolt at the store}. Cut your fabric at 21" so you have 1 BIG piece that is 21"x44".


 Then unfold your fabric and lay it out on your cutting mat. You will then cut 4 pieces. 2 that are 17"x21" and 2 that are 3"x21".


Do the same with both the print and the solid fabrics.

Pin your printed fabric {right sides together} along the two long sides and ONE of the small sides. This will form the sides and bottom of your bag.


If you can find a right side to your solid... pin those together.. otherwise it doesn't matter which way you pin them. Just make sure that you leave a 5" opening on the bottom of the bag. So, pin the two long sides and the bottom leaving the opening. I always double pin where I will be starting and stopping my sewing!


Now that you are all pinned, use your sewing machine {straight stitch} or a serger to sew them together.


Repeat for your print piece. Now it's time to work on those straps! Grab the 3" strips you cut. Place one print and one solid with right sides together. Then sew or serge down both of the long sides.


I found that for the next step if was easier if I ironed my strips flat before turning them right side out.


This is the hardest step in the whole bag making process... turning those pesky straps right side out! Grab a saftey pin and attach it to the end. Then you are going to tuck the pin inside the "tube" you created. Slowly inch it through the tube until it comes out the other end. Straighten out your fabric and remove the pin. Repeat for the other strap.


Once you get that saftey pin all the way out, iron your straps flat ...


... then top stitch the sides to keep your straps flat.


Now, turn your printed bag piece right side out and stuff it inside the solid piece {this is inside out} so that right sides are together and the inside of your bag is on the outside. Did you follow all that?

{p.s. you see that big "J"? Well, it was my attempt at some homemade applique ... more in posts to follow!}


Next you are going to tuck those straps inside - between the solid and printed pieces. Choose which side of the strap you would like on the outside and place it face down against the printed fabric. I pinned my strap edges about 2" from either side of my bag.

Pin 1 strap to each side of your bag. Make sure you strap is smooth {not twisted} as you pin.. otherwise your strap will be twisted on the finished bag.


I opted to straight stitch the to of my bag {around where you pinned the straps on} becuase I wanted to do a wider seam allowance. That way when I turn my bag right-side out and stitch along the top it will help reinforce the top of the bag and the straps by sewing through the seam allowanced fabric as well as the top of the bag. Does that make sense? I hope so!!


Remember that little opening in the solid fabric? Well, here's why. Pull the printe fabric through that opening to turn your bag right side out. Then you stuff the solid print back down into your printed fabric. Voila! You have a lined bag! But, what about that little opening....


Grab a couple pins. line up the two sides of the opening as if it were stitched together and pin the sides together. Then use a 1/4" or 1/8" seam allowance to stitch the bottom of your bag together. If you don't want anyone to see it {which they really won't anyway since it's the bottom of the inside of the bag} choose thread that matches the color of your fabric.


Then iron around the top of your bag, stitch around it, iron again to set the stitching.. and you are done!


.. and yes.. they are BIG bags! My kids have high hopes to fill them up this year!


You can adjust the size of your bag to suit your needs! If you want to make a tote bag or a reusabe grocery bag, I suggest you use either duck cloth or home decor weight fabric. They will hold up better for everyday use!

Happy sewing!!
Photobucket